 vs
vs
Hobart Brickies Football · Opponent Scout · Week 2
Portage Indians
Fri Aug 28 · 7:00 PM · HOME — Brickyard Stadium (Pop Warner Night) · Fresh Thu 8/27 @ Portage · JV Sat 8/29 @ Portage
Who They Are
paper scout + wk-1 film layerNew coach, install year
First-year HC Cody French (from Michigan City). The wk-1 film confirms a SIMPLE menu: one front, one coverage, four-man rush. Expect week-2 wrinkles, not a new identity.Wk 1: L 7–34 (home)
Beaten by Hammond Morton at home. The chart below is that game — Morton wrote the first draft of our plan.Two-way load
Most of their best go both ways (Fuentes, Alanis, Merritt, Hill, Whisby, Brown…). Tempo + long drives = a 4th-quarter weapon. Depth falls off fast.#8 Apollo Gibbs — their best player
SR · 6'2 210. Their featured RB — listed at BOLB on their sheet, but he played little defense in wk 1 (HC film review). If 8 shows on D it's situational — flag it; expect #11 Brittain there.What The Film Says — Wk 1 vs Morton
engine-computed from your staff's v2 chart (with gains) · verification: ALL CHECKS PASS43 OVER — 77%
One-front team: 43 OVER on 37 of 48 tagged fronts. The change-ups are base 43 (6) and 43 UNDER (5). If your rules beat 43 OVER, they beat Friday.C4 on 88%
Quarters almost every snap (43 of 49 competitive plays). Sprinkles: C2 ×2, C0 ×2, C1 ×1 + a “C4 SPECIAL (C4/C1)” ×2.53% · 11 explosives
What Morton did vs them: 53% success, 22% explosive (11 chunk plays incl. an 81-yd screen TD). Runs 58% succ / 21% expl · passes 48% / 24%. 3rd & 7+: 38% allowed (n=8).Blitz 10%
A 4-man-rush team. Rate climbs by down: 5% → 12% → 20% on 3rd. Calls: MIKE ×2 DBL A ×2 WILL C ×1. Direction when it came: A-gap ×2, boundary ×1. And it got burned: 80% success against their 5 blitzes (vs 50% when they rushed 4).UNCAPPED 23/25
When your staff charted the deep cap, the concept was UNCAPPED 23 of 25 times. Their quarters is leaving the top open — carry the shots.Front mix (n=48 tagged · counts from the chart)
43 OVER37/48 · 77%
436/48 · 12%
43 UNDER5/48 · 10%
HC film review — their three looks:
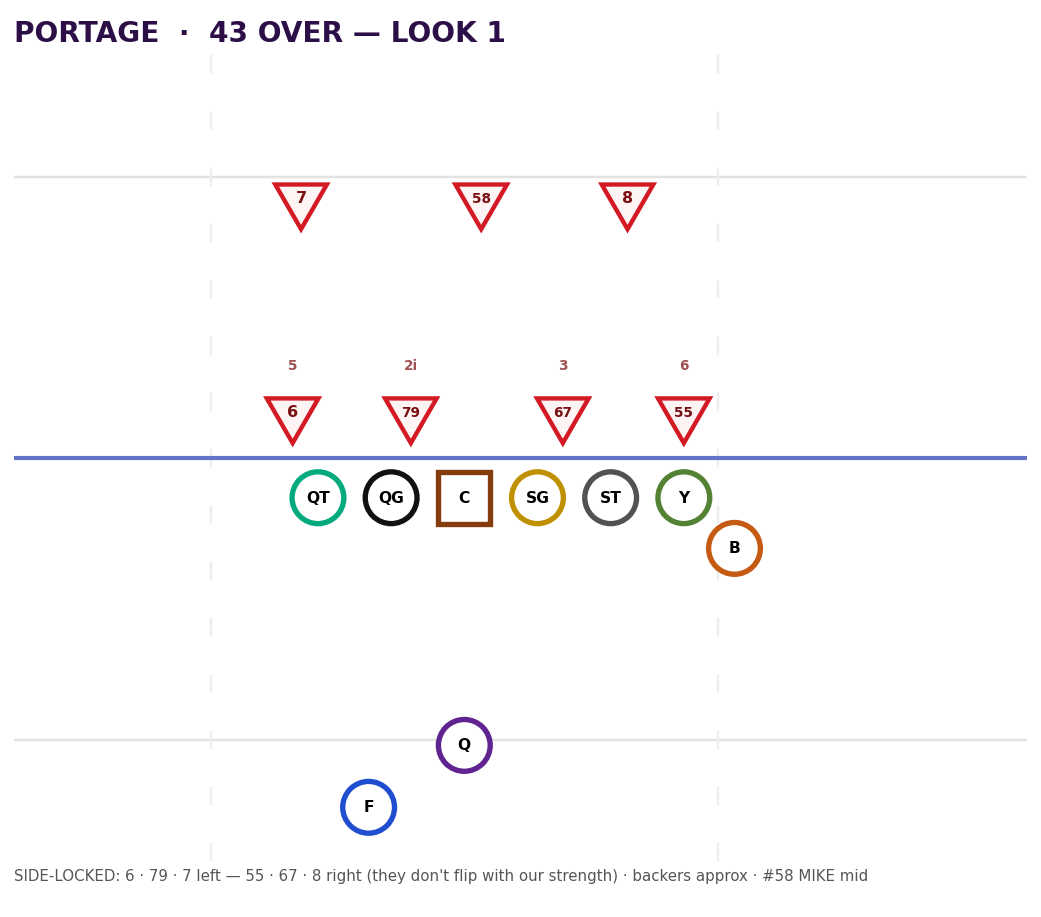
43 OVER L1: 5 (QT side) · 2i (QG side) · 3 (SG side) · 6 (Y side)
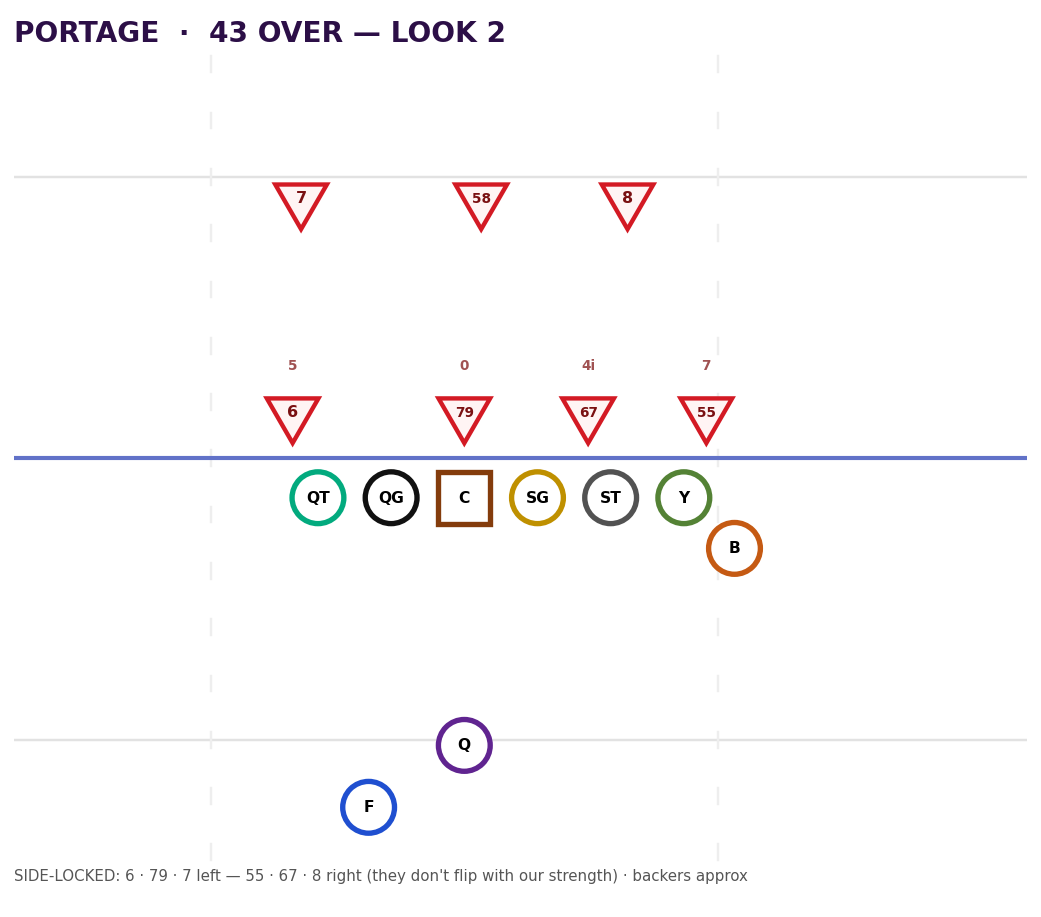
43 OVER L2: 5 (QT side) · 0 head-up · 4i (ST side) · 7 (Y side)
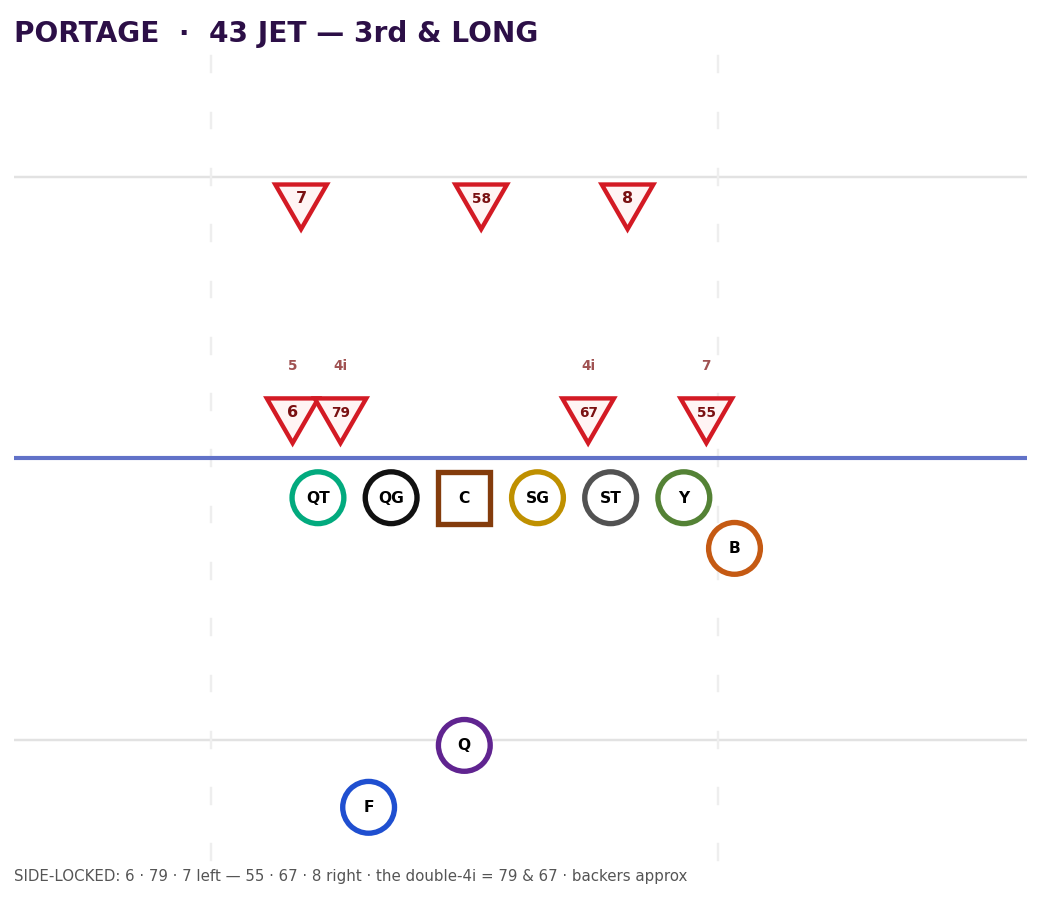
43 JET (3rd & long): 5 (QT side) · 4i (QT side) · 4i (ST side) · 7 (Y side)
SIDE-LOCKED personnel: #6 · #79 · #7 their left — #55 · #67 · #8 their right — #58 mid. They don't flip with our strength: our formation call picks the matchup.
43 OVER L1: 5 (QT side) · 2i (QG side) · 3 (SG side) · 6 (Y side)
43 OVER L2: 5 (QT side) · 0 head-up · 4i (ST side) · 7 (Y side)
43 JET (3rd & long): 5 (QT side) · 4i (QT side) · 4i (ST side) · 7 (Y side)
SIDE-LOCKED personnel: #6 · #79 · #7 their left — #55 · #67 · #8 their right — #58 mid. They don't flip with our strength: our formation call picks the matchup.
Coverage families (of 49 plays)
C443/49 · 88%
C22/49 · 4%
C02/49 · 4%
C11/49 · 2%
By down (what Morton saw)
| DN | n | Morton ran | Success vs them | Top coverage | Blitz rate | Calls |
|---|---|---|---|---|---|---|
| 1 | 19 | 58% run | 53% · 16% expl | C4 (16), C2 (1) | 5% | DBL A |
| 2 | 16 | 50% run | 62% · 25% expl | C4 (13), C2 (1) | 12% | MIKE, WILL C |
| 3 | 10 | 50% run | 40% · 30% expl | C4 (9), C0 (1) | 20% | MIKE, DBL A |
| 4 | 4 | 0% run | 50% · 25% expl | C4 (3), C4 SPECIAL - C4 / C1 (1) | 0% | — |
The 11 explosives they gave up (run ≥10 / pass ≥15)
| DN&D | Gain | Type | Coverage | Result |
|---|---|---|---|---|
| 1&15 | +27 | Run | C4 | Rush |
| 3&10 | +18 | Pass | C4 | Complete |
| 2&10 | +30 | Pass | C4 | Complete |
| 3&15 | +81 | Pass | C4 | Complete, TD |
| 1&10 | +15 | Run | C4 | Rush |
| 2&24 | +13 | Run | C2 | Rush |
| 3&11 | +16 | Pass | C4 | Complete |
| 2&8 | +35 | Pass | C4 | Complete |
| 1&20 | +17 | Run | C4 | Rush |
| 2&3 | +18 | Run | C4 | Rush |
| 4&6 | +16 | Pass | C4 SPECIAL - C4 / C1 | Complete |
Coverage by hash
| Hash | Coverages seen |
|---|---|
| L | C4 (11), C0 (2), C2 (1) |
| M | C4 (5) |
| R | C4 (25), C4 SPECIAL - C4 / C1 (2), C2 (1) |
Field zones charted: OPEN FIELD 21 RED ZONE 12 COMING OUT 11 BACKED UP 3 GOAL LINE 1
Secondary technique (charted on ~27 snaps)
- Boundary CB: UNDER INSIDE 12/27 · UNDER OUTSIDE 9/27 · OVER OUTSIDE 5/27
- Field CB: UNDER INSIDE 11/27 · UNDER OUTSIDE 9/27 · OVER OUTSIDE 5/27
- Boundary S: OVER INSIDE 23/27 · OVER OUTSIDE 3/27 · UNDER INSIDE 1/27
- Field S: OVER INSIDE 22/27 · OVER OUTSIDE 3/27 · OVER INSIDE. 1/27
Corners sit UNDER (41 of 54 charted corner snaps) · safeties stack OVER-INSIDE (46 of 54). Under-leverage corners + inside safeties = out-breakers and the perimeter are open by alignment.
Your staff's film notes (verbatim, tied to snaps)
- #4 (SS): “Runs down the alley HARD. Sure tackler.” (1&10, 43 UNDER/C4)
- Screens, twice: “Does not recognize screen and react well” (3&15 → gave up a TD) · “Don't react fast on the perimeter to bubble screen” (2&8).
- #79 (NG): “Plays the screen GREAT on this one. Double 4i look on 3rd and long.” — screens go AWAY from 79.
- Scramble drill: “FC comes up to take the QB.” — QB movement uncovers the field-corner's man.
Every snap — the 49 competitive plays behind every number above (12 of 61 tagged rows excluded: penalties/timeouts/1 fumble-recovery row)
| # | DN&D | YL | H | R/P | Front | Blitz | Cov | Result |
|---|---|---|---|---|---|---|---|---|
| 2 | 1&15 | -25 | L | Run | 43 OVER | C4 | Rush | |
| 3 | 1&10 | 48 | R | Pass | 43 OVER | C2 | Complete | |
| 5 | 3&5 | 43 | R | Run | 43 OVER | C4 | Rush | |
| 6 | 4&4 | 42 | R | Pass | 43 OVER | C4 | Complete | |
| 8 | 2&8 | -12 | L | Pass | 43 OVER | MIKE | C4 | Complete |
| 9 | 3&12 | -8 | R | Run | 43 OVER | C4 | Rush | |
| 10 | 1&10 | -41 | M | Pass | 43 OVER | C4 | Incomplete | |
| 11 | 2&10 | -41 | R | Run | 43 OVER | C4 | Rush | |
| 12 | 3&10 | -41 | R | Pass | 43 OVER | MIKE | C4 | Complete |
| 13 | 1&10 | 41 | R | Pass | 43 UNDER | C4 | Incomplete | |
| 14 | 2&10 | 41 | R | Pass | 43 OVER | C4 | Complete | |
| 15 | 1&10 | 11 | L | Run | 43 UNDER | C4 | Rush | |
| 16 | 2&10 | 11 | R | Pass | 43 UNDER | C4 | Incomplete | |
| 18 | 3&10 | 11 | R | Pass | 43 OVER | C4 | Incomplete | |
| 19 | 4&10 | 11 | R | Pass | 43 OVER | C4 | Complete, TD | |
| 20 | 1&10 | -24 | R | Run | 43 OVER | C4 | Rush | |
| 21 | 2&15 | -19 | R | Pass | 43 | C4 | Incomplete | |
| 22 | 3&15 | -19 | R | Pass | 43 OVER | C4 | Complete, TD | |
| 23 | 1&10 | -26 | R | Run | 43 OVER | C4 | Rush | |
| 26 | 1&22 | -29 | R | Run | 43 OVER | C4 | Rush | |
| 28 | 2&24 | -27 | L | Run | 43 | C2 | Rush | |
| 29 | 3&11 | -40 | R | Pass | 43 UNDER | C4 | Complete | |
| 30 | 1&10 | 44 | L | Run | 43 OVER | C4 | Rush | |
| 31 | 2&19 | -47 | L | Pass | 43 OVER | C4 | Complete | |
| 32 | 3&9 | 43 | R | Pass | 43 | C4 | Complete | |
| 33 | 4&6 | 40 | R | Pass | 43 OVER | C4 | Sack | |
| 34 | 1&10 | -11 | R | Run | 43 OVER | C4 | Rush | |
| 35 | 2&8 | -13 | R | Pass | 43 OVER | C4 | Complete | |
| 37 | 1&20 | -38 | M | Run | 43 OVER | C4 | Rush | |
| 38 | 2&3 | 45 | L | Run | 43 | C4 | Rush | |
| 39 | 1&10 | 27 | R | Pass | 43 OVER | C4 | Complete | |
| 40 | 2&4 | 21 | R | Run | 43 OVER | C4 | Rush | |
| 42 | 1&10 | 15 | L | Pass | 43 OVER | C4 | Incomplete | |
| 43 | 2&10 | 15 | L | Run | 43 OVER | C4 | Rush | |
| 44 | 3&2 | 7 | L | Run | 43 OVER | DBL A | C0 | Rush |
| 45 | 1&2 | 2 | L | Run | 43 OVER | DBL A | C0 | Rush |
| 46 | 2&1 | 1 | L | Run | 43 OVER | C1 | Rush, TD | |
| 47 | 1&10 | -32 | R | Run | 43 OVER | C4 | Rush | |
| 48 | 2&5 | -37 | L | Pass | 43 OVER | C4 | Complete | |
| 49 | 1&10 | -45 | M | Pass | 43 OVER | C4 | Complete | |
| 50 | 2&6 | -49 | R | Pass | 43 UNDER | C4 | Interception | |
| 51 | 1&10 | 21 | R | Pass | 43 OVER | C4 | Incomplete | |
| 52 | 2&10 | 21 | R | Run | 43 OVER | WILL C | C4 SPECIAL - C4 / C1 | Rush |
| 54 | 3&12 | 23 | M | Run | 43 | C4 | Rush | |
| 56 | 4&6 | 17 | R | Pass | 43 | C4 SPECIAL - C4 / C1 | Complete | |
| 57 | 1&1 | 1 | R | Run | Rush, TD | |||
| 58 | 1&10 | -34 | L | Pass | 43 OVER | C4 | Sack | |
| 59 | 2&18 | -26 | M | Run | 43 OVER | C4 | Rush | |
| 61 | 3&24 | -20 | L | Run | 43 OVER | C4 | Rush |
Data honesty: film layer = 61 defensive snaps from ONE game (wk-1 vs Morton), charted by our staff — week-2 opponents change less than you'd think, but it is one game. Efficiency (success/explosive) is computed from DN-DIST-GAIN in the v2 re-export (verified). Cushion/collision/closure were charted +/−/0; confirm the sign convention with the DB coach before anyone repeats those. Run/pass derived from RESULT. Jersey numbers still follow THEIR exchange sheet.
Portage Defense — Two-Deep
DE-DT-NG-DE four-down · BOLB/Sam/Mike · field-boundary secondaryPortage Defense — Two-Deep
DE-DT-NG-DE four-down · BOLB/Sam/Mike · field-boundary secondary
Front
DE
6
S. Hill
27
J. Jones · JR
bu
▼ scout note
Strong, aggressive, quick twitch off the ball. Does NOT close — runs up the field when unblocked. Let him run himself out of the play: trap him, read him, throw behind him.
DT
67
A. Alanis
40
C. Raddatz · JR
bu
NG
79
K. Merritt
▼ scout note
FILM (wk1): “Plays the screen GREAT.” Screens away from 79. Also showed a DOUBLE-4i look on 3rd & long.
DE
55
A. Ortiz
51
S. McLaurin · SR
bu
Backers
BOLB
8
A. Gibbs
11
J. Brittain
bu
SAM
7
T. Burelison
25
D. Mcmahon
bu
MIKE
58
O. Fuentes
50
S. Thiel · JR
bu
Secondary
FC
12
Z. Parker
1
T. Farmer · JR
bu
▼ scout note
FILM (wk1): scramble drill — the field corner comes UP to take the QB. When the QB extends, the FC's man is uncovered behind him.
SS
4
L. Whisby
14
C. Kile · SR
bu
▼ scout note
FILM (wk1): “Runs down the alley HARD. Sure tackler.” He is the run-support trigger — hold him with play-action, then throw where he vacated.
FS
3
K. Brown
5
A. Baldazo Jr. · SR
bu
BC
2
R. Gray
16
K. Rice · SR
bu
The Plan
⚠ interpretation — the AI Coordinator's read, now film-backedBuilt on the verified wk-1 chart + the paper scout
- They are one defense: 43 OVER + Cover 4 — three alignments total (two Over looks + the 43 JET on 3rd & long, spelled out under Front mix). Install the week vs those pictures and rep them fast — every look you'll see Friday is on this page.
- Screens are the cheat code — but throw them AWAY from #79. Their staff-charted weakness showed twice (one went for a TD vs Morton). #79 is the one who sniffs them out.
- Carry the shots: UNCAPPED on 23 of 25 charted verticals — and it cashed: 11 explosives in 49 snaps (22%), incl. 81 yards on a 3rd-&-15 screen. Under-leverage corners + inside-stacked safeties also give up the out-breakers by alignment.
- Play-action owns #4. The SS triggers downhill hard (sure tackler vs the run) — hold him with a fake, throw the glance/alley behind him. On scramble, the FC takes the QB: move the pocket and hit the uncovered man.
- Protection is easy math on 1st/2nd (blitz 5–12%) — and when they DID bring it, Morton hit 80% success. Expect heat on 3rd (20%: MIKE / DBL A / WILL C, A-gap flavored); have the blitz-beater ready, it pays.
- Wear them out on purpose. Their line is their D-line (Alanis + Merritt inside at 270+). Tempo, 8+ play drives, perimeter first — the 4th quarter is ours by design.
- Special teams alert: if #39 doesn't kick, their own sheet says "going for 2" — carry the 2-pt defense call from snap one.
POWERED BY